Fine-tune a model with Microsoft Foundry
Source: Oai Assignment · GitHub · microsoft/generative-ai-for-beginners Authors: Microsoft (microsoft) Licence: MIT — https://spdx.org/licenses/MIT.html
This notebook follows the current Microsoft Foundry fine-tuning workflow. It uses the OpenAI Python SDK (v1) pointed at your Foundry resource's /openai/v1/ endpoint, so the same code also runs against the OpenAI platform with only the client setup changed.
Prerequisites
- A Microsoft Foundry project, with the Foundry Owner role (required to fine-tune and deploy).
pip install "openai>=1.0" python-dotenv- A
.envfile withAZURE_OPENAI_ENDPOINTandAZURE_OPENAI_API_KEY(see the course setup guide).- A currently supported base model such as
gpt-4.1-mini(see the fine-tunable models list).
Fine-tuning improves a foundation model by retraining it on additional examples relevant to your task. Prompt-engineering techniques like few-shot learning and retrieval-augmented generation enhance the prompt with relevant data, but they're limited by the model's context window.
With fine-tuning you retrain the model itself (using many more examples than fit in the context window) and deploy a custom version that no longer needs those examples at inference time. This improves quality, frees up the context window, and can lower cost and latency by shortening prompts. Under the hood, Foundry uses LoRA (low-rank adaptation) for efficient training.
Foundry supports three techniques: supervised fine-tuning (SFT) - used in this tutorial - plus DPO (preference alignment) and RFT (reinforcement fine-tuning). The workflow has four steps:
- Prepare and upload your training and validation data.
- Run the training job to create a fine-tuned model.
- Monitor the job, review metrics, and choose a checkpoint.
- Deploy the fine-tuned model and use it for inference.
In this tutorial we fine-tune gpt-4.1-mini with SFT to build a chatbot that answers questions about the periodic table with a limerick.
Step 1.1: Prepare Your Dataset
Let's build a chatbot that helps you understand the periodic table of elements by answering questions about an element with a limerick. In this simple tutorial, we'll just create a dataset to train the model with a few sample examples of responses that show the expected format of the data. In a real-world use case, you would need to create a dataset with many more examples. You may also be able to use an open dataset (for your application domain) if one exists, and reformat it for use in fine-tuning.
Since we are focusing on gpt-4.1-mini and looking for a single-turn response (chat completion) we can create examples using this suggested format reflecting the OpenAI chat completion requirements. If you expect multi-turn conversational content, you would use the multi-turn example format which includes a weight parameter to signal which messages should be used (or not) in the fine-tuning process.
We will use the simpler single-turn format for our tutorial here. The data is in the jsonl format with 1 record per line, each represented as a JSON-formatted object. The snippet below shows 2 records as a sample - see training-data.jsonl for full sample set (10 examples) we'll use for our fine-training tutorial. Note: Each record must be defined in a single line (not split across lines as is typical in a formatted JSON file)
{ "messages": [{"role": "system", "content": "Elle is a factual chatbot that answers questions about elements in the periodic table with a limerick"}, {"role": "user", "content": "Tell me about Gallium"}, {"role": "assistant", "content": "Gallium, oh gallium, so light - Melts in your hand, oh what a sight - At 86 degrees - Its liquid with ease - And in semiconductors, it's out of sight"}]}
{ "messages": [{"role": "system", "content": "Elle is a factual chatbot that answers questions about elements in the periodic table with a limerick"}, {"role": "user", "content": "Tell me about Hydrogen"}, {"role": "assistant", "content": "Hydrogen, the first in the line - The lightest of all, so divine - It's in water, you see - And in stars, it's the key - The universe's most common sign"}]}
In a real-world use case you will need a much larger examples set for good results - the tradeoff will be between quality of responses and the time/costs for fine-tuning. We are using a small set so we can complete fine-tuning quickly to illustrate the process. See this OpenAI Cookbook example for a more complex fine-tuning tutorial.
Step 1.2: Upload your dataset
Upload your training and validation files to Foundry with the Files API (purpose="fine-tune"). Providing a validation file lets Foundry report validation loss so you can spot overfitting.
Before running the code below, make sure you have:
- Installed the SDK:
pip install "openai>=1.0" python-dotenv - Created a
.envfile withAZURE_OPENAI_ENDPOINTandAZURE_OPENAI_API_KEY
The code creates an OpenAI client pointed at your Foundry resource's /openai/v1/ endpoint, then uploads both files and prints their IDs.
import os
from openai import OpenAI
from dotenv import load_dotenv

load_dotenv()

# Point the OpenAI SDK at your Microsoft Foundry resource's /openai/v1/ endpoint.
# (For the OpenAI platform instead, use: client = OpenAI()  with OPENAI_API_KEY set.)
client = OpenAI(
    api_key=os.environ["AZURE_OPENAI_API_KEY"],
    base_url=f"{os.environ['AZURE_OPENAI_ENDPOINT'].rstrip('/')}/openai/v1/",
)

training_response = client.files.create(
    file=open("./training-data.jsonl", "rb"), purpose="fine-tune"
)
validation_response = client.files.create(
    file=open("./validation-data.jsonl", "rb"), purpose="fine-tune"
)

training_file_id = training_response.id
validation_file_id = validation_response.id

print("Training file ID:", training_file_id)
print("Validation file ID:", validation_file_id)
Step 2.1: Create the Fine-tuning job with the SDK
# Create the fine-tuning job.
# trainingType "GlobalStandard" is the recommended tier (lower cost, faster queue).
# Use "Standard" if you need regional data residency, or "Developer" for cheap experiments.
job = client.fine_tuning.jobs.create(
    model="gpt-4.1-mini",              # base model to fine-tune
    training_file=training_file_id,
    validation_file=validation_file_id,
    suffix="elements-limerick",        # helps you identify the resulting model
    seed=105,                          # makes the run reproducible
    extra_body={"trainingType": "GlobalStandard"},
)

job_id = job.id
print("Fine-tuning Job ID:", job_id)
print("Status:", job.status)
Step 2.2: Check the status of the job
Here are a few things you can do with the client.fine_tuning.jobs API:
client.fine_tuning.jobs.list(limit=<n>)- list the last n fine-tuning jobsclient.fine_tuning.jobs.retrieve(<job_id>)- get details of a specific jobclient.fine_tuning.jobs.cancel(<job_id>)- cancel a jobclient.fine_tuning.jobs.list_events(fine_tuning_job_id=<job_id>, limit=<n>)- list events from the jobclient.fine_tuning.jobs.checkpoints.list(<job_id>)- list deployable checkpoints (the last few epochs)
When the job starts, Foundry first validates the training file to make sure the data is in the right format. Training then runs and can take from minutes to hours depending on the model and dataset size.
# List the last 10 fine-tuning jobs
client.fine_tuning.jobs.list(limit=10)

# Retrieve the current state of your fine-tuning job
client.fine_tuning.jobs.retrieve(job_id)

# List up to 10 events from the job
client.fine_tuning.jobs.list_events(fine_tuning_job_id=job_id, limit=10)
# Track the job status until it is complete
response = client.fine_tuning.jobs.retrieve(job_id)

print("Job ID:", response.id)
print("Status:", response.status)
print("Trained Tokens:", response.trained_tokens)
Step 2.3: Track events to monitor progress
# Track progress in a more granular way by checking events.
# Re-run this cell until you see "The job has successfully completed".
response = client.fine_tuning.jobs.list_events(job_id)

events = response.data
events.reverse()

for event in events:
    print(event.message)
# When the job finishes, the last few epochs are available as deployable checkpoints.
# Best practice: don't blindly deploy the final epoch - review the checkpoints and pick
# the one that generalizes best (watch train_loss vs. valid_loss and token accuracy).
checkpoints = client.fine_tuning.jobs.checkpoints.list(job_id)
for cp in checkpoints.data:
    print(cp.fine_tuned_model_checkpoint, "| step:", cp.step_number)
Step 2.4: Review status, metrics, and checkpoints in the Foundry portal
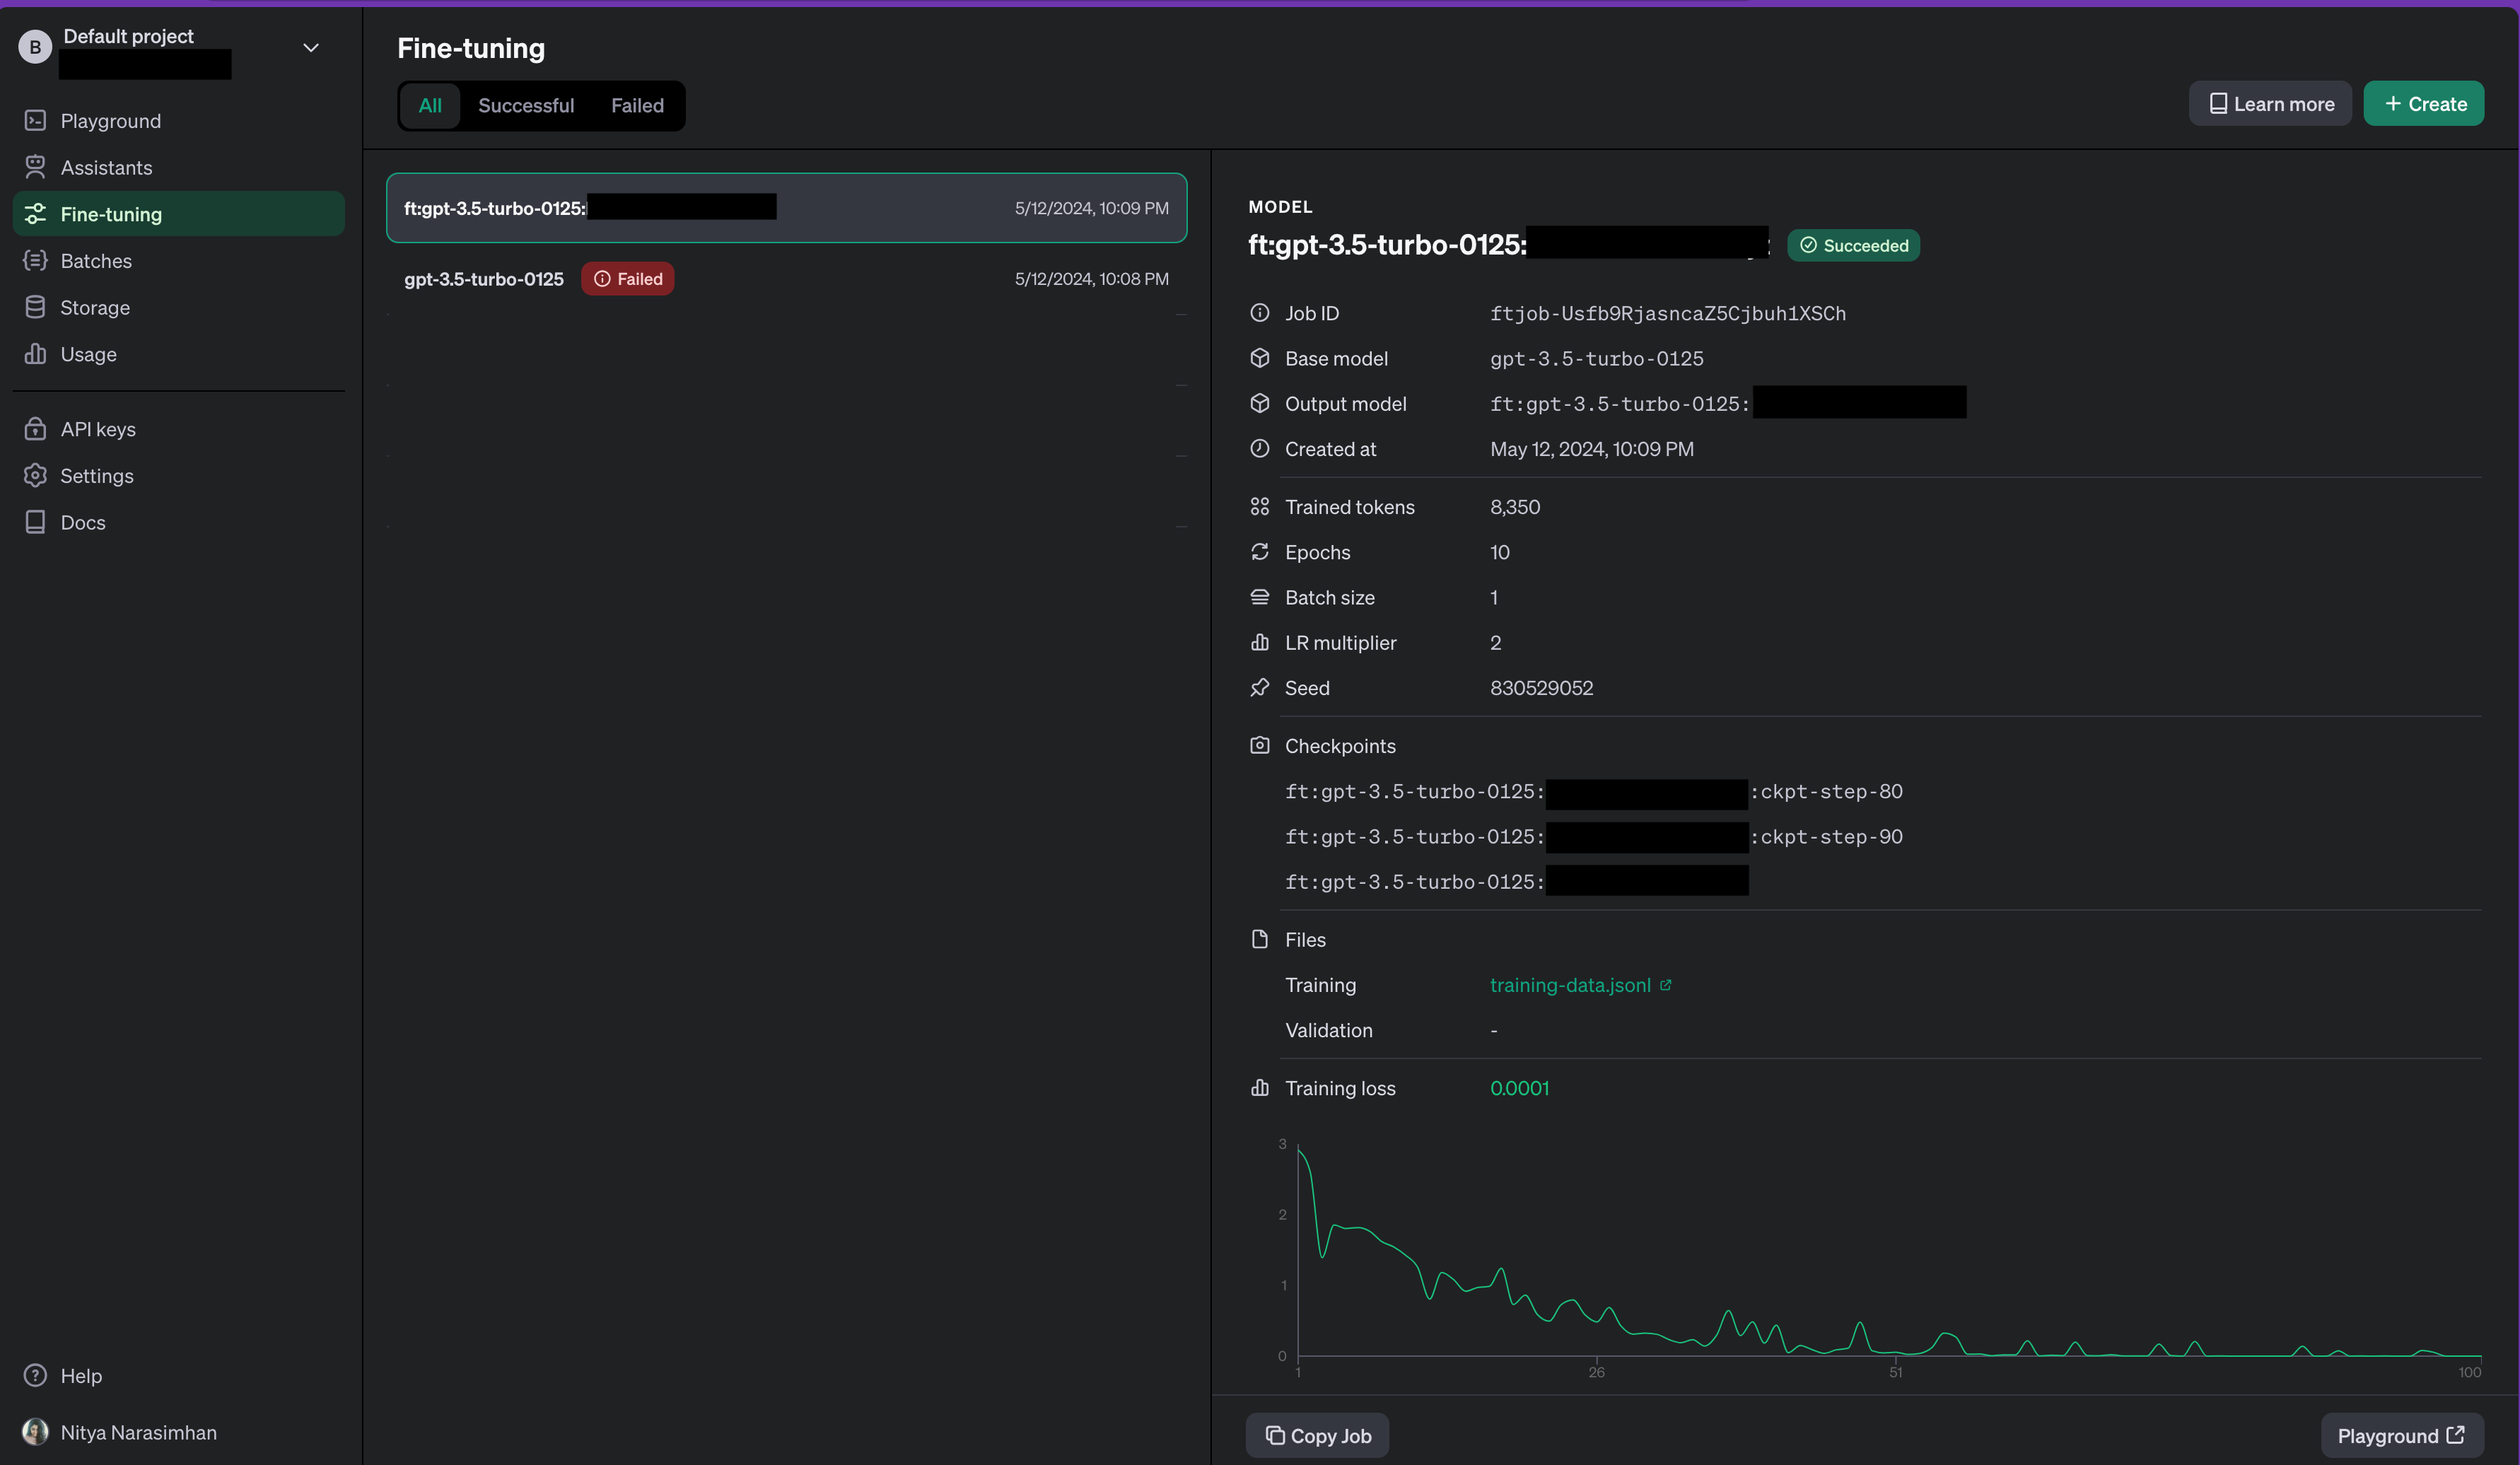
You can also track the job in the Microsoft Foundry portal under Build > Fine-tuning. Select your job to see its status, training events, hyperparameters, and metrics. Watch these metrics:
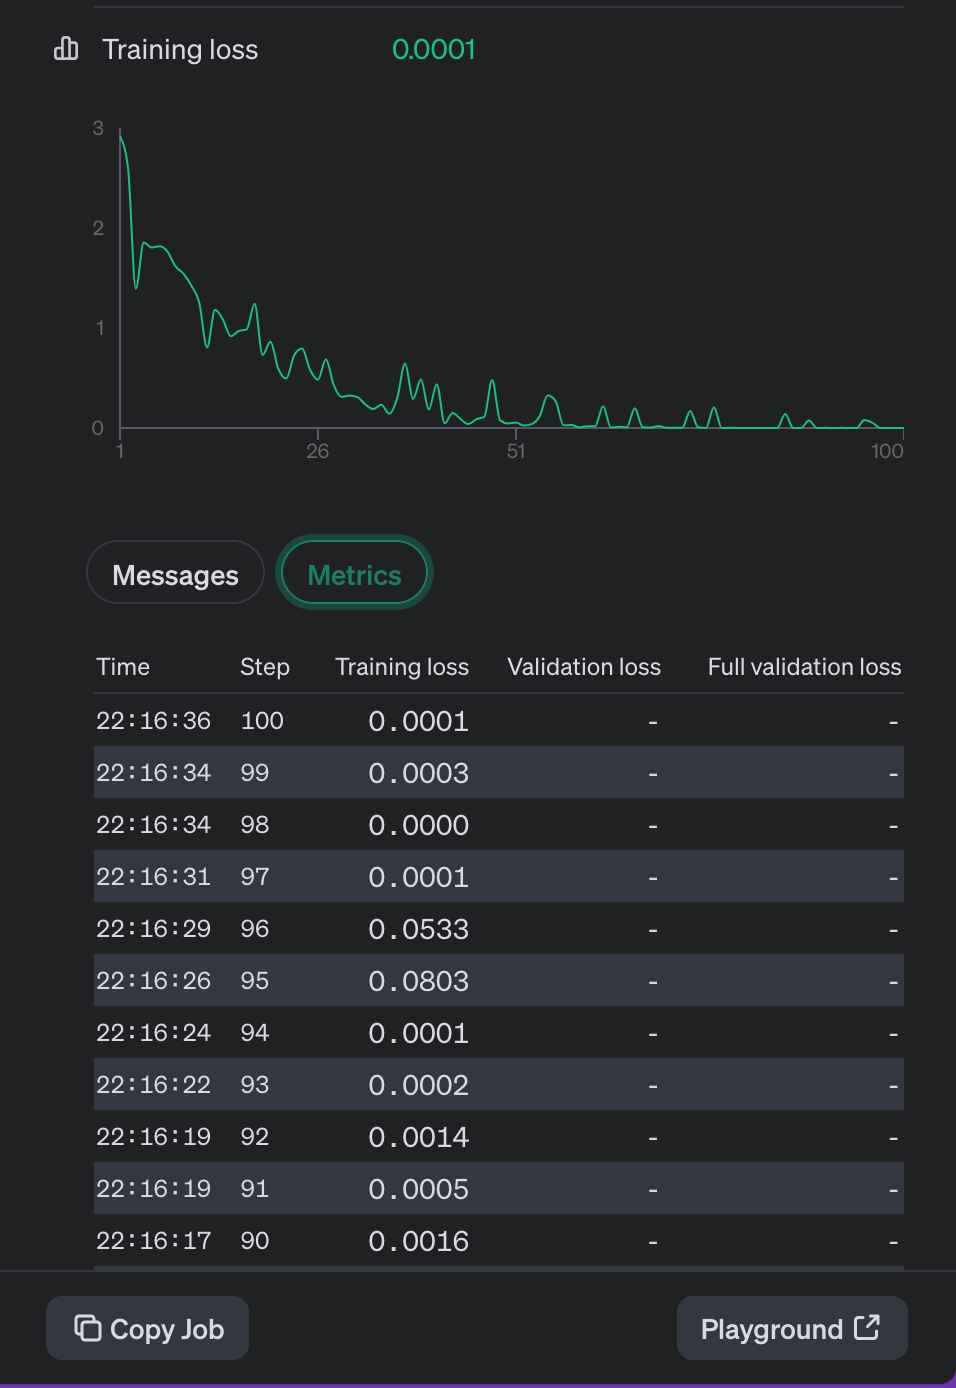
train_lossandfull_valid_loss- should decrease over time.train_mean_token_accuracyandfull_valid_mean_token_accuracy- should increase.
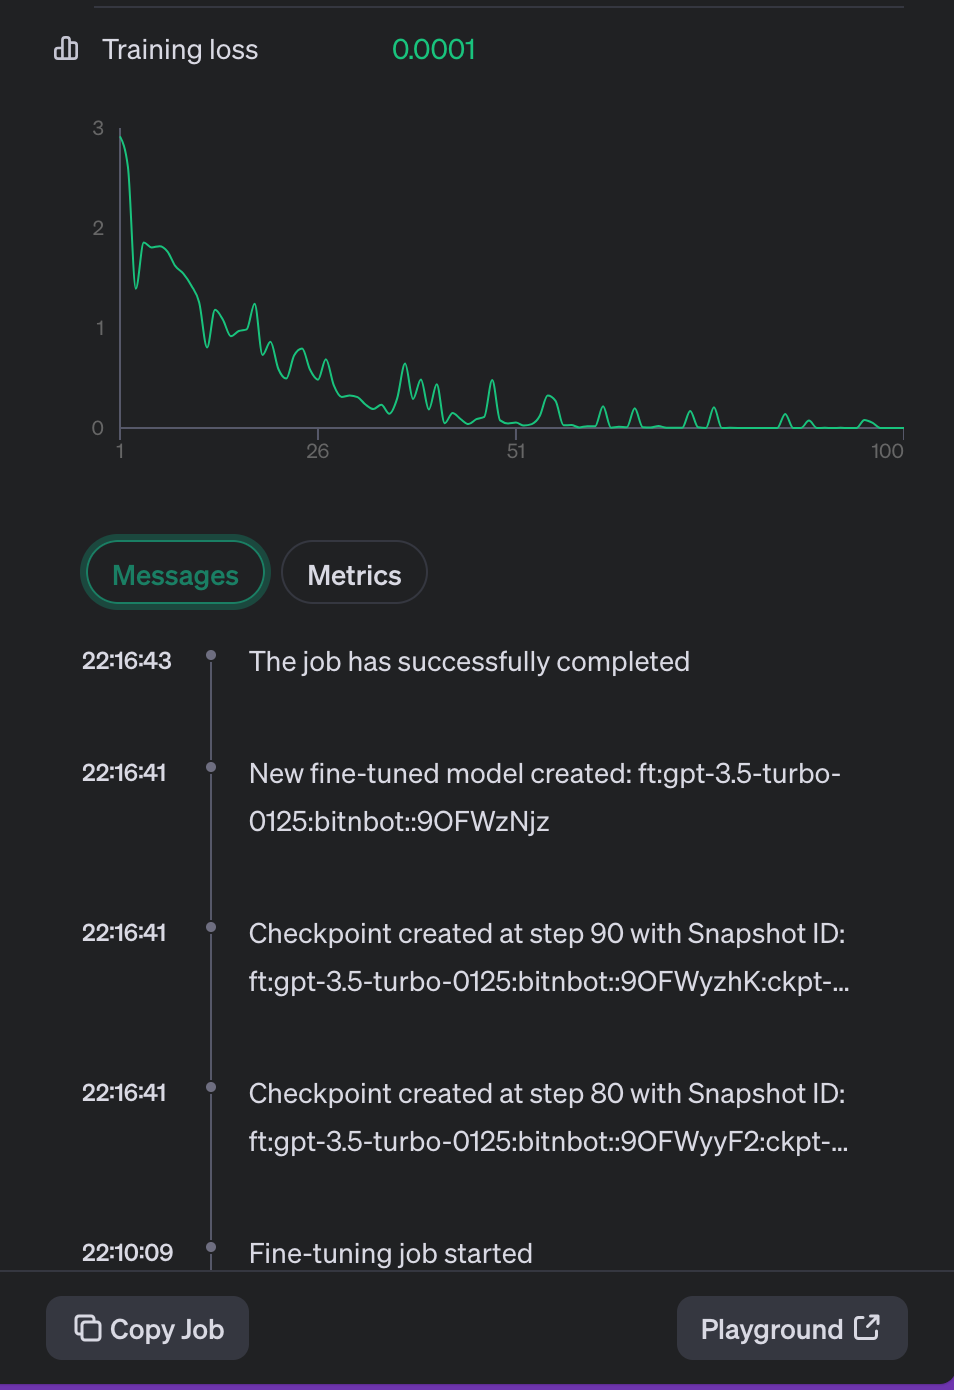
If the training and validation curves diverge, you may be overfitting - try fewer epochs or a smaller learning-rate multiplier. The illustration below shows the kind of status, message, and metric panels you'll see (the exact UI varies by provider).
You can also view the status messages and metrics by scrolling down further in the visual dashboard as shown:
| Messages | Metrics |
|---|---|
 |
 |
Step 3.1: Retrieve the fine-tuned model id
When the job succeeds, response.fine_tuned_model holds the id of your custom model (for example, gpt-4.1-mini-2025-04-14.ft-...). On Azure you then deploy that model before you can call it.
# Retrieve the id of the fine-tuned model once the job has succeeded
response = client.fine_tuning.jobs.retrieve(job_id)
fine_tuned_model_id = response.fine_tuned_model
print("Fine-tuned Model ID:", fine_tuned_model_id)
Step 3.2: Deploy the fine-tuned model
Unlike the OpenAI platform (where you can call the fine-tuned model id directly), Microsoft Foundry requires you to deploy the model first. The easiest way is the Foundry portal: go to Build > Fine-tuning, select your finished job, and choose Deploy. Give the deployment a name (for example, elements-limerick) - that deployment name is what you'll call from code.
You can also deploy programmatically with the control-plane REST/ARM API; see the deployment guide. Remember that a deployed custom model bills hourly, and an inactive deployment is removed after 15 days.
# Once deployed, call your fine-tuned model by its DEPLOYMENT name via the Responses API.
# (On the OpenAI platform you'd pass fine_tuned_model_id directly instead.)
deployment_name = "elements-limerick"  # the name you gave the deployment in Foundry

completion = client.responses.create(
    model=deployment_name,
    input=[
        {"role": "system", "content": "You are Elle, a factual chatbot that answers questions about elements in the periodic table with a limerick"},
        {"role": "user", "content": "Tell me about Strontium"},
    ],
    store=False,
)
print(completion.output_text)
Step 3.3: Test your fine-tuned model in the Foundry playground
You can also test the deployed model in the Microsoft Foundry portal Playground - pick your fine-tuned deployment from the model dropdown and try a prompt. Use the same system message you trained with; a different system message can change the behavior.
Tip: Compare the fine-tuned model with the base
gpt-4.1-miniside by side. Notice how the fine-tuned model returns answers in the limerick format from your examples, while the base model just follows the system prompt.
This is a deliberately simple example to show the process, not a real-world dataset. In production you'd fine-tune on real data (for example, a product catalog for customer service), where the quality difference is far more apparent - and matching that quality with prompt engineering alone would cost many more tokens per call. For a more complete example, see the OpenAI Cookbook fine-tuning guide and the Foundry fine-tuning tutorial.